Showing posts with label WW2 Naval. Show all posts

Thursday, 29 March 2018

A Night Out with the H Class

The fifth Destroyer flotilla was out and about on my wargames table this week, using a nice old Admiralty chart of the English Channel I randomly generated a scenario that saw four German Z class destroyers trying to pass down the channel to get to Occupied St Nazaire.   The Flotilla Leader would be the (fictional) Light Cruiser HMS Orion, with HMS Hardy, Hasty, Hero and Hotspur as her destroyers.

The location of the action was also randomly generated, between the Varne and Colbert banks, with the Germans having past Cape Griz Nez and its long range guns, and approaching Dungeoness.  

The 5th Destroyer flotilla was proceeding up channel, with a torpedoed merchantman added into the mix somewhere ahead.   

With the action taking place at night the visibility is limited in the extreme, but this is mid-war so I allowed Orion radar.  


The first action was HMS Hunt taking survivors from the burning wreck of the merchantman.  Some tricky dice work needed to see it off.  As that was going on the Z Class intervened and Hunt had to withdraw, damaged.  


Orion intervened and began a chase, knocking out one of the Germans almost immediately.  The Germans actually ran through shoaling water to get clear.  

HMS Hero stood off the sinking German to take off the crew, whilst Orion, Hotspur and Hasty made after the Germans.  HMS Hasty incidentally consistently rolled low and wallowed behind the others, perhaps with boiler problems.

The Germans lost one more destroyer to a parting salvo from Orion, before contact was lost.  This occurred just in the location some helpful sailor type has written on my chart,  Still it was only a couple of quid on eBay... 

Game over, with one British destroyer damaged and two Germans sunk.  

I will have to sort out that Narvik chart!

Tuesday, 29 November 2016

Somewhere in the South Atlantic 1939, Game 2

The carrier HMS Hermes was built on a cruiser hull, and was therefore somewhat smaller than the later WW2 fleet carriers, but she was purpose built to carry planes (sea-planes initially) and had fore and aft lifts.  She carried a squadron of twelve Swordfish torpedo bombers, and in my second game, with the Kriegsmarine capital ships Blucher and Scheer being shadowed by HMS Cumberland I decided that it is the swordfish that will be next to have a go at the Germans.


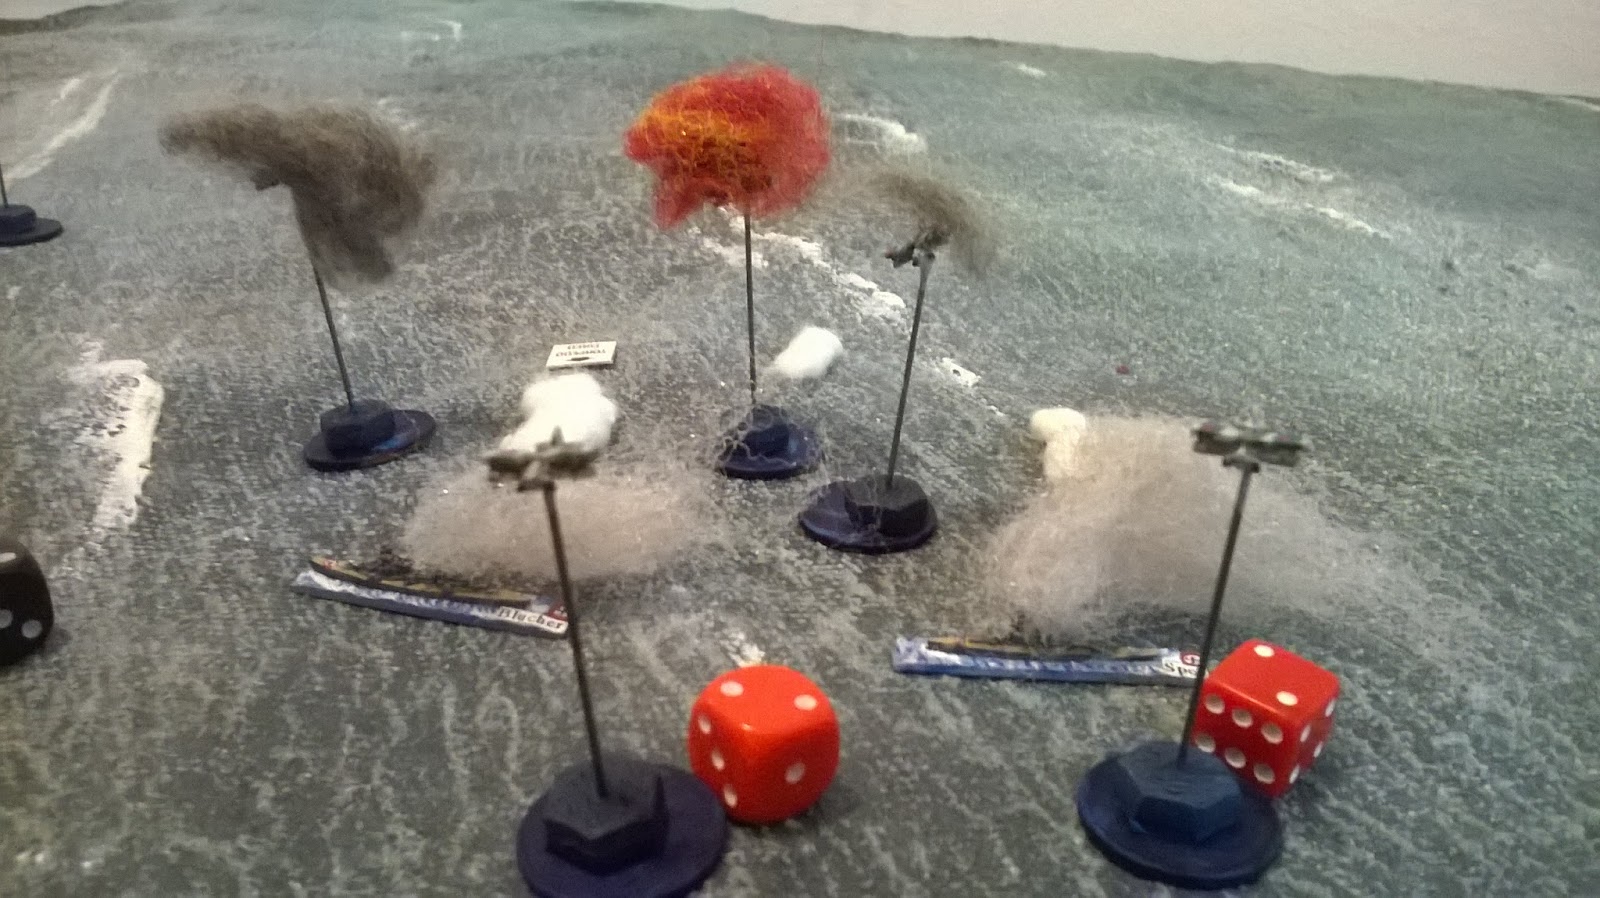
Two of the aircraft failed to get onto the tabletop, one being lost in a catapult accident, and another having engine problems and ditching.  That is annoying since I had painted up all twelve.  Come to think of it I painted the carrier as well, and that doesn't get on table. .  That left me with two formations of, five aircraft to take on the Germans, Red Flight and Blue Flight.  They entered the table at mid ceiling, level 3, dropping quickly to level 2 height.   


Red flight was first to attack, taking the port side of the German ships.  The Nord-Reich as a Merchant ship was an easy target, but not the priority here.  She turned and moved off to the east.  I divided red flight into two waves.  The first three dived to level 1, 100 feet, and moved in.  The German AA Flak should have dealt with this easily.  

The Swordfish was a notoriously slow aircraft, and almost immediately young Ginger, leading red Flight, found himself exploding at 100 feet, failing to drop his torpedo.  The remaining two in the first wave did manage to drop and began to climb to level two trying to avoid the flak.


Ginger comes to a quick end.
As I turned the Kriegsmarine ships away the second wave dropped from level 1, and also turned away climbing.  Miraculously, apart from the loss of their red headed leader, Red Flight had four of its aircraft regrouping for the return to Hermes.


I turned the Blucher and Scheer sharply to port, as Blue Flight dropped to level 1.  Sly old Squadron leader Quigglesworth, leading Blue Flight in two waves, dropped the first torpedoes cleanly.  Then the havoc started as Bertie's Swordfish lost its engine to flak and dropped into the sea astern of Scheer.  Another of Quiggles flight exploded as it failed to climb away quickly enough, and the Squadron Leader himself had an oil fire in his engine.  That however has never stopped a hero like Quiggles, and he probably made it back to the Hermes with a blazing engine, smoking a woodbine and drinking a horse`s neck of gin!


Quiggles loses half his flight to Flak
I suddenly realised that Quiggles had spread his torpedoes so that one was aimed at Blucher, the rest at Scheer.  Amazingly the Scheer took two torpedoes to the stern, exploded and rolled over.  Blucher took a torpedo midships, essentially undamaged, but critically in game terms, slowed.


Not sure why that lead Destroyer is going the wrong way!
So it seems that the campaign will come down to HMS Renown and her Task Force B.  With Blucher damaged that is probably overkill. (to put it mildly)

Please note that the model of HMS Hermes is in perfect proportion, being the same size as the Cruiser Cornwall in this picture.  My Ark Royal is of a similar length to Renown.  

With the South Atlantic out of the way I will probably turn to the cruise of the Bismarck!


Battle of the River Plate, sort of...

I rediscovered my 1:6000 WW2 Naval collection this morning.  With a huge electrical storm closing in on Cyprus today some gaming seemed the best thing to do with my time  I went for early 
war, and some cruiser actions.  As a wargamer I added in some what if... angles.


The Battle of the River Plate was the first naval battle in the Second World War and the first in South American waters. The German cruiser Admiral Graf Spee was loose in the South Atlantic  and one of the hunting groups of Commonwealth cruisers discovered her off the South American coast.


In my version of history Admiral Scheer (and note that the Brits thought that the Spee was in fact the Scheer) has escaped into the South Atlantic.  The Admiralty has however realised that a second German capital ship, the Blucher, a Deutschland class heavy cruiser, and the Nord-Reich, an auxiliary supply vessel, have made the journey to join her.  


A naval task force has been sent in pursuit of Blucher, hoping to meet with her before the Germans can unite their capital ships.    

In the first game I gave the Commonwealth four cruisers.  HMS Exeter, Ajax and Achilles all fought at the River Plate so were my first choice.  HMS Cumberland was refitting in Port Stanley in the Falklands and so missed the battle, but rejoined the squadron in time to blockade Graf Spee in Montevideo.  For my alternate history Cumberland would be with her sisters, and the first game would have them fighting the Pocket battleship Admiral Scheer.  


The Scheer was sighted at 12000 yards, against the Commonwealth Squadron which was steaming parallel in two divisions, Ajax leading Achilles, and to starboard Exeter leading Cumberland.  The rules would be GQ3, really super detailed, so this one would take a while!


Sheer opened fire as the Royal Navy split forces, their lines diverging.  Ajax came under fire, and immediately took damage as Scheer ranged in.   The other Royal Navy ships began to range in on Scheer, but it was too late for Ajax, as both her front turrets were lost and she was severely damaged.  Making smoke Ajax fell out of line, circling away.  Achillies speed was reduced after a shell exploded among her boilers.  Both light cruisers were out of the fight.


Exeter`s 8 inch guns managed to range in on Scheer, and caused some damage, but the Germans now turned their guns on Exeter and Cumberland.  Trading salvos Exeter was silenced and slowed to a minimum speed.  Her bulkheads gone and clearly sinking by the bow.  Cumberland running past her made smoke to cover herself as Scheer turned away.  

I decided that Scheer had done enough, and turned for the table edge heading for the horizon.   With Cumberland nervously shadowing her the Scheer went in search of Blucher.

The General Quarters 3 rules are really some of the most detailed I`ve ever used.  I quite liked them but it made for a very slow game.   I may have to cut them down to size a little, but overall I`m on to someting with them.  The photos show that this is an empty battlefield.  My 1:6000 ships are lovely models, and they really convey the sense of distance needed for WW2 naval.  


So it`s on to game 2.  The Battle Cruiser HMS Renown, of 15 inch guns, with the Carrier HMS Hermes and her (814) squadron of Swordfish torpedo bombers, have followed Blucher to the South Atlantic.   Next time it`s a bigger game altogether (and may even need two games?)