Sunday 29 November 2020

9 Para at the Bois du Mont 8th June 1944

The Bréville Gap 1944

The Airborne troops who landed by parachute and glider in Normandy on D-Day troops, under Major-General Richard ‘Windy’ Gale, seized key bridges and villages in the area between the Orne and Dives Rivers.  The British 6th Airborne Division had been detailed to secure the eastern flank of the invasion beaches, in the hope that this would forestall any German counterattacks on that flank.  

In the days that followed 6th Airborne Division held precariously to the bridgehead they had seized to the east of the Orne River.  The Germans counterattacked fiercely at points all across the bridgehead, but one area that swiftly became a key focal point was the area of the village of Bréville, strategically situated atop the Bavent ridge.  

Facing the German build up in Bréville was the under strength 9th Parachute Battalion, fresh from their successful and heroic attack on the Merville Battery.   With a strength of only 70 men they occupied  the woods of the Bois de Mont on the night of7th June, and then came under increasing pressure from the Germans in Bréville from 8 June onwards.   The Germans from 346. and 711. Infanteriedivisionen, attempted to force a gap through the Allied perimeter, a gap that would give them access to the bridges over the Orne River and Caen Canal, captured during the hard fought battles on D-Day.   


The 9th Battalion column arrived at the chateau area at 0130 hours on June 8th.  Lt. Colonel Otway decided to defend a wooded area south of the chateau called the Bois des Mont. The woods offered better cover and the chateau was a likely target for German bombardments. The Paras sent regular patrols through the chateau grounds to prevent the Germans from occupying the buildings. 

At dawn the military significance of the position became obvious. From the southwest corner of the woods, the Paras had an unobstructed view all the way to the Orne River bridges. If the Germans occupied the woods they would be able to direct artillery towards the bridges and use the woods as cover to launch a counter attack towards the bridges and into the left flank of the invasion beaches. 

Otway placed “A” Company on the north side of the woods facing the chateau grounds, “B” Company on the west side of the woods facing Bréville, and “C” Company on the south side of the woods forming the battalion’s reserve. 

9 Para's defensive box was in the centre of the Bréville gap, unsupported on both flanks, but in a position that needed to be held if the bridges to the west were to be protected. 

The Campaign


German attacks came at the Paras from Bréville itself as well as from behind the Château St. Come and it's stables.  They have six possible start points, that could be used to randomly generate attack lines in a solo game.

Setting up the Defence

Before dawn on the 8th Lieutenant Slade conducted a recce patrol of the Château to confirm the presence of the enemy.  As the patrol departed, the other paratroopers ‘brewed up’ ‘monkey block,’ - tea, made from powdered tea leaves, milk and sugar consolidated into a single cube, boiled in mess tins over a solid fuel tablet. 

Slade 's patrol followed the yellow gravel driveway to the château , lined with manicured trees and a grass verge on either side with a ditch cut into it.  Beyond the château itself were large stone stable blocks and more woods, ideal positions for the Germans to launch attacks.  A local civilian told Slade that there were two British gliders in the fields to the rear of the house.  Knowing these were a possible source of vital supplies Slade sent half his men to search, whilst he himself searched the château .  Finding no Germans but with the intelligence of the gliders presence confirmed Slade made a hasty return to the Bois du Mont.

Fortifying The Bois Du Mont

The wooded edges of the woods offered concealment and the reverse slope position provided a degree of protection from German artillery firing from the other side of the ridgeline. More importantly, the nature of the surrounding bocage would funnel the advance of oncoming enemy towards the villa.  From the moment of their arrival, and with little respite, the Paras began digging defensive slit trenches.

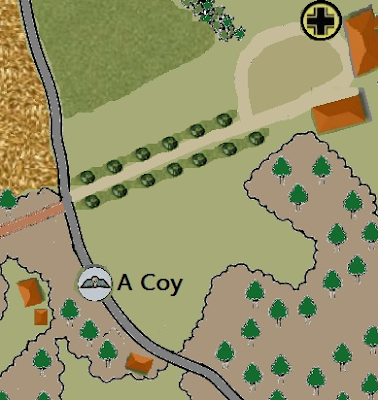
German forces attempting to attack from the château would have to traverse the open ground of the fenced paddocks on the other side of the road immediately in front of the Bois du Mont.  If they attacked up the road from Bréville they could be brought under fire from the sunken lane on the left flank of the position.  

A Company extended their position across the road, digging into a ditch along the edge of the thick line of trees that ran towards the southern end of the château.  The Company was deployed in an L shape and this arm of the salient would be named Bomb Alley by the paras.  It allowed enfilade fire to the front but was vulnerable to German infiltration through the woods behind, which would take any enemy attempting to cross it in their flanks. 

To cover A Company's front as well as support B Company Sergeant McGeever’s single Vickers MMG was dug into an old dried-out pond on the north-east corner of the defensive box, between both Companies.  This turned the open area in front of the château into a lethal killing zone. 

9 Para had little in the way of anti tank capability but Sergeant Knight and his Projector, Infantry, Anti-Tank weapons dug in at the top of the sunken lane near the MMG, covering both company's fronts. With a range of only 100 metres, the PIATs were at best a close quarter weapon. 

The sunken lane B Company dug into was a natural defensive feature. Its wooded banks were topped by a mass of dense undergrowth and it became steeper as the submerged track sloped down to its western end. B Company had only enough men to cover a frontage of 100 metres, but were reinforced by two captured Wehrmacht MG 34 machine guns, mounted to fire over the thick mass of brambles. 


Building the Chateau St. Come.


One of the buildings I will need for these games is the Chateau.  I decided that a basic representation would do me, and proceeded to cut and stick until I had a shape that was approximately right.  Once I finish it with render ivy and scatter, not forgetting the mortar damage from 1944 it will look the part.  


The Germans

As 9 PARA enhanced their defences around the Bois du Mont, Lieutenant General Erich Diestel's 
346th  Infantry Division began to arrive in the area in strength.  The 857th Regiment of three battalions of infantry had made the journey to Bréville on bicycles.  It was a formidable division . Its order of battle fielded another two German infantry regiments, the 858th and 744th, and an Ost regiment of Russians. The division also had its own artillery regiment and armoured support in the form of Panzer Mark IVs and StuG IV self-propelled guns. 

The decision not to hold the château gave the Germans an advantage, as they could use the cover of the house and its stable blocks to mask their approach from the low ground to the south and east side of Bréville.  

Thursday 8th June 1944 
Scenario One: The probe.

The first attack came from a fighting patrol of platoon size  designed to probe 9 PARA’s strength and defensive layout. It came in across the fields along the road from Bréville onto the flank covered by B Company. German infantry advanced over the small lip of higher ground immediately to the front.  The two captured MG34 machine guns were at each end of the Paras line.  Sergeant Len Daniels was at the top of the lane manning one of the MG 34s.  It would seem that the order to ‘Open fire!’ was only given as the Germans came within 50 metres and had to face this "overwhelming firepower." 

Scenario Two:  The attack from the Château

The second attack on 8th June came just over an hour after the earlier probe, this time across the paddocks in front of the château. Like the first attack it was made without artillery or mortar support and, although it came from a different direction, the Germans’ tactic of a direct frontal assault was unchanged.  Against this A Company and Sergeant McGeever’s supporting Vickers machine gun were a thin red line.

Scenario Three: Bomb Alley

After the initial assault had faded, Sgt Jenkins, commanding the weak "platoon" in the salient saw a section of Germans crawling through the bushes only two metres away. They were attempting to infiltrate through the thick undergrowth to the villa on the other side of the bank.   A stiff grenade and SMG fight followed.  

Scenario Four, The Vickers Box

During the afternoon a pair of jeeps arrived from Division with additional supplies for 9 Para.  Two medium mortars and two more Vickers MMG were delivered and assigned to hastily trained riflemen.  Sergeant McGeever's Support platoon now had five MMGs including the two captured MG 34s.  When the next attack came it was another probing attack across the open ground in front of A Company.  McGeever and Corporal McGuinness rushed one of their guns to a forward position opposite the drive and began engaging the enemy.  The Germans were facing enfilade fire from three machine guns, as well as A Company's Stens and rifles.  This was the last significant attack of the day against 9 PARA’s position around the villa. 

My second round of games looking at 9 Para and the Bois du Monts will focus on June 9th, as the situation becomes more desperate.

My games will use fictitious names for both sides, mainly because I feel it's more respectful to refrain from using any historical names in a game setting. 

9 Para
Lt Colonel "Aleister" Sim
Maj Eric Sykes
Captain Pete Sellars
Captain William Hay
Lt Terence Thomas
2nd Lt. Kenneth Horne
2nd Lt. Leslie Philips
RSM Windsor Tudor Davies
CSM Georgie Formby

Sgt Charles Drake
Sgt Leslie Dawson
Sgt Kenny Williams
Sgt Roy Kinnear
Sgt Bobby Holdness. 
Sgt Harry Corbett
Sgt Ronnie Corbett

Cpl Sid James
Cpl Bobby Monkhouse
Cpl Bernie Manning
Cpl Cribbins
Cpl Ernest Wise
Cpl Edward Rogers

L/Cpl Dickie Emery 
L/Cpl Terrance Milligan
L/Cpl Davy Allen
L/Cpl Artie Askey
L/Cpl Teddy Ray

Pte Terrence Scott
Pte Norman Wisdom
Pte Harold Secombe
Pte Ronald Barker
Pte Stanley Unwin
Pte Francis Howerd
Pte Martin Feldman
Pte Kenny Connor
Pte Bernie Breslaw
Pte Benny Hill
Pte Eric Morcambe
Pte Richard Briars
Pte Charlie Hawtrey


Friday 20 November 2020

Rendezvous with Destiny, 4: On the Outskirts of Town

Rendezvous with Destiny

Scenario 4 On the Outskirts of Town.   

Background.
As the worst of the counterattacks end, the US forces continue the push down the road towards Carentan. The Germans establish a hasty defence on the outskirts of town to stem the tide.


Patrol Phase Deployment
A Delaying Action, in the main rule book and all deployment  is as stated there. The US  and German initial Patrol Marker deployment options are shown above.

The US player has ten support points available.

The German player has four support points available.  The German player begins with one full Chain of Command Dice.


From the Diary of Lt. Harry "Bing" Crosby,
101st.
"With the Krauts on the run we advanced on Carentan.  Once again we were lead platoon, and once again I put Bobby Hope on point. The Germans had come up with a hasty defence and my plan was to put maximum firepower into them.  They have given me Sergeant "Danny" Kaye and his squad from second platoon, and I put him with Costello.  That old man will look after the boy...  Abbott and his squad will stick with me..."

That really is Bing in a Lieutenant's uniform by the way. 
A scene from the movie White Christmas.  Danny is just
out of shot to the left, having a huge panic attack.  Serves
them right for singing at the Germans!


Sergeant Bob Hope in 1944...
Sometimes truth is stranger than fiction,
although he is on stage telling jokes 
here rather than fighting the "Krauts".

The Germans take a medic and an extra MMG team.

The Yanks take a Sherman, the by now obligatory .50 Cal and an extra squad.


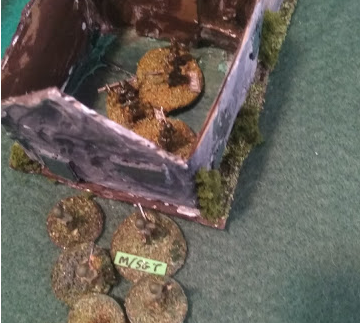
The scenario needs three buildings, and although I have some of the Pendraken Normandy farm houses I really wanted to create "shells" I can place figures into.  Things like this tend to delay my games and these are no exception, but I don`t expect to create perfect commercial quality models for these.  Some nice robust wargaming building shells will do quite nicely.

The basic shells are recycled Eureka cardboard packaging, easy enough to do although I made sure that they would pack inside each other for storage.  These won't get any roofs.  Window shutters and doors will be coffee stirrer sticks and the render a filler/plaster mixed with sand.  I put an attic sections into one of the buildings.

Doors, windows and plaster

Authentic green shutters

Almost finished, but they need to dry out and have the edges lined
and the highlighting before my Germans can get their MG42s inside.


On with the game.
The bare table


Patrol phase

The deployment points

The 101st get initiative.  Sergeant Bob Hope leads first squad on along the hedgerows.

A 50 Cal goes down, with a jeep to drive it around it gets into position behind a hedgerow.

Sergeant Telly Savalas motors along in a supporting M4

The Germans infiltrate Lmg teams into the buildings

With the 50Cal pounding the first farmhouse Bob leads his boys in a run across open ground


Bob leads the assault.  Its bloody to the point f lunacy.  The Germans are wiped out, but Bob falls, shot through the joke book

Little Willi surrenders for the third time during this campaign.

Lt Bing moves the 50Cal to hammer a second farmhouse

A panzerfaust shot at the tank.

Master Sergeant Danny Kaye sprints his squad into range of farmhouse two now being hammered by the 50Cal.  Singing his happy song (the Ugly Duckling?) Danny prepares to lead the squad in an assault

The Germans get a team over the hedgerow and cause two casualties and a shock to the .50Cal.

But the MMG manages to turn on them and its basically a wipe out.

Danny goes all out.  The assault kills four of the German Lmg team.  Danny loses three men


But Danny survives!  The Germans on the right are casualties being removed!

Telly Savalas uses an HE round on the last farmhouse. 

But a panzerfaust round puts an end to Telly's career

Chalk up a hit for Bruno Streik of the Dusseldorf Streiks.  This is the last German team and Bruno leads his men on a run back to the Jump off Point after this.

The Americans have won but at a terrible price.  Costello has been wounded and Hope has gone down.  The platoon is down to a single squad.  Even the replacements under Sergeant Danny Kaye lost men.

For the final scenario, "Last stand of the Green Devils," 2nd platoon and Sergeants W.C Fields and Jack Benny must step up.

Wednesday 18 November 2020

And One For All! Painting the figures..


Since my Three Musketeer figures have now arrived I decided to get on with painting them.  These 40mm Eureka miniatures are quite amazing in terms of detail.  They are based on the appearance of the characters from the classic 1973 Richard Lester movie.
I went with an initial order of the Musketeers themselves, plus D'Artagnan, Rochefort and the hired blade, a figure based on the swordsman who picks a fight with Porthos on the road to Calais. 

The scenery for this project is a one off  I had a pinboard, 40mm by 55cm.  Covering this with some brown card was the first step.  Next I covered this surface with square Flagstones, and then used pva to seal the surface.  This represents the inside of an inn, a street or town square or the courtyard of a palace or castle.  
With this as the playing surface I added surrounding wall sections for two sides.  This is very much a film set idea, and the background only needs to be suggested.  The walls are L shaped, allowing them to stand independently,  although the flat pack with a big clip to hold them onto the board in storage. 

Actually I did an extra wall so that I could divide the area yet again,  perhaps to denote an inside and outside area.  In fact I also created a ship template, so that the scenery can depict a docked vessel, a nod to Disney's 1990s Three Musketeers.  

Turning to the figures I am mightily impressed.  These are fabulously detailed miniatures.  My Cardinal's Guard are still in the post as the second tranche, but with the first six figures alone I can enjoy some varied games.  
The first figure I tackled was Christopher Lee's Rochefort.  The Cardinal's Blade is a snazzy dresser.  Wearing red velvet and red leather, a red hat and even a red feather, he is a challenge.   The secret was to go with shading.  He needed different reds, on different garments, but shades of those Red's in those areas too.  I gave him the white lace highlights, but added in black lining to make it stand out.  The figure is difficult to get to the point where it doesn't look like it was easy to paint, just a red wash.  I finally got Rochefort to the point where I was happy, although the face and eye patch were a challenge.


Next up Micheal Yorke's young D'Artagan. The Gascon adventurer wears much poorer clothing than the other characters.  He is in poor homespun browns and beige shades. I went with G.I colours from WW2, although the Red leather hanger and slightly more red brown boots add some colour.  The blond hair was also a challenge since I wanted to get it right.  The facial features actually do closely resemble the actor, and the fighting pose is far more loose and would than the controlled stance of Rochefort.


The fight director of the 1973 Three Musketeers was Richard Hobbes, a legendary Hollywood sword fight master.  For the movies he used original seventeenth century Rapier moves, from the period when fighting with these swift fencing and thrusting weapons were coming to prevalence. Hobbes recognised that the forms that Fencing later fell into were not yet established, and thus we get the different styles from the controlled Rochefort to the wild enthusiasm of D'Artagnan. 
Hobbes appears in the movie as the "drunken" assassin who challenges Porthos on the road to Calais.  The figure of the hired blade, using a sword in each hand, is based on Hobbes.  It gave me a template for painting.


Richard Chamberlain's Aramis is all about style.  Tall and slim, with lots of black clothing, white buttons and lace.  The figure is sculpted with his weight on the back foot about to launch a lunge and the left arm high as a counter balance.  It's identical to a renaissance illustration of rapier fencing.


The fussy and ostentatious Porthos of Frank Findlay was one of the most difficult to complete.  He wears and brocaded jerkin style jacket, with slashed sleeves and posed ready to spring.  It's and portly figure that really does resemble Frank.  I lined the jacket in white and hat in yellow.

The last of my figures is Oliver Reed's Athos.  In many ways the most difficult because of the preponderance of black.  He has some white in lace and the shirt and collar under the jacket, but I needed to vary the black with washes on the different garments. One particularly difficult colour to get was his leather jacket covering only the torso.  It's a shiny texture I could only achieve with a gloss varnish on that central area.  A great figure, he looks like a leader, "Softly Gentlemen!'"


My "easy take" on the 'And One For All' rules.
INITIATIVE
Roll off d6 for the quality of insult or wit highest wins.

Insults
1.  Your poor fashion sense     
2.  Your dubious paternity     
3.  Your Mother's good looks
4.  Your face
5.  Your horse
6.  Your Mistress' bosom

Banter
I intend to gather some banter quotes from a Multiplayer game. 
Proposed list.
1. Really?
2. Whatever!
3. F*ck off big nose!
4. My middle finger salutes you Sir!
5. Your Father smells of elderberries.
6. I fart in your general direction.

French School Fencing
Extra dice if players utilise the correct terminology
In "Swashbuckling"
Allez Monsieur!  Come on Monsieur  "Lead on"
Touché   a hit, a palpable hit.
Attaque de fer, on the opponents blade
Prets?  ready
Croisé  crossing blades.  A pass. 
Flick   cut at the face with the point (poor form)
Press  opponents blade out of line
Presént  offer the blade for engagement - playing to the gallery

"Attacks"
Lunge   Attack moving forward with the point - impetus
Thrust  Attack in line with the point

Swashbuckling
Figures move in straight lines.  
Perform swashbuckling actions, or free move and select another figure. 
Pass by rolling d6 for first action, 2d6 for second 3d6 for third etc... Roll a 1 fails and loses initiative.
Lose initiative or stop and you lose the accumulated swashbuckler dice.
Actions directed at enemy figures, they roll their rating dice to duck or avoid.
Move into contact, may still insult, kick slap, feint, slash or fence.

Examples  of  actions: 
•  Dodging  an  object  or  person. 
•  Picking  up  and  throwing  a  plate 
•  Pulling  a  rug, tapestry or curtain
•  Leaping  onto  or  off  a  table  or  barrel  or  other  object
•  Leaping  over  a  table  or  barrel 
•  Jumping  and  grabbing  a  chandelier 
•  Swinging  on  a  chandelier 
•  Sliding  down  a  banister  
•  Rolling  a  barrel  
•  Running  up  or  down  a  flight  of  stairs 
•  Slapping  or  punching  or  kicking 
•  Insulting  and  taunting  an  enemy 
•  Feint with your blade
•  Slash with your blade
•  Play to the gallery
•  Make a brag
Some  actions may  be split  into  two  separate  actions if  you  wish,  eg  picking  up  an  object,  then  throwing  it, or  pushing  over  a  barrel, then  rolling  it.   The  reason for  doing  so  is  to  accumulate  swashbuckling  dice 

Opposed Actions & Ratings 
An opposed action is one which is directed at an enemy figure, such as throwing a plate, rolling a barrel, punching, kicking, insulting, etc.  In this case, the enemy figure rolls dice equal to its Rating:  
4  Superb: Rochefort & D’Artagnan   
3  Magnificent Three Musketeers  
2  Dashing  Cardinal’s Guards 
1  Good  Other figures

Attacks
Duels are declared as attacks.  Roll your rating dice and any or all swashbuckling dice earned.  I see this as lunging, stabbing with the point.
Each dice higher than the enemy is a hit.  Two sixes increases to 7, 3 to 8.

5A.  Swashbuckling   Hits table  
1st  hit      Pushed Back 
2nd hit      Stunned 
3rd  hit      Dropped Weapon  
4th  hit +   Wounded  

5B.  Duelling Hits Table  
1st  hit      Pushed Back 
2nd hit      Wounded 
3rd  hit      Dropped Weapon  
4th  hit +   Wounded 
* Attacker takes hits if he loses.
Three wounds figure drops, unconscious. 
Stunned, and dropped weapon recovery are swashbuckling actions

Duelling Bonuses 
Figures may get bonus dice to their duelling rolls: 
Elevation:   +1 dice
Each extra friendly figure in contact with enemy:  +1 dice
Opponent Weaponless:  +1 dice
Impetus:  +1 dice  (if in a lunge attack must follow up - both opponents gain the +1
When the attacking figure finally duels, both players roll dice.  The duel consists of one round of dice rolls. 
The attacking figure rolls its accumulated swashbuckling dice plus its Rating dice, plus any bonuses.  
The defending figure rolls its Rating dice, plus any bonuses.  
The results are worked out similarly to opposed swashbuckling actions, ie the highest roll on a single dice wins.  The difference in totals is the number of hits taken by the loser.  Note that the attacker does take hits if it loses.
Attacker must press forward if a lunge was used.

Shooting
Only ever get 1 action dice for an aim.  Roll your rating.  No reloading with these weapons.

Markers
Markers should be placed beside a figure to indicate setback.  To indicate wounds, simply adjust the base on the figure.  Dropped weapons (swords) Stunned - black disc marker under base.
Roll off d6 for the quality of insult  highest wins.