Tuesday, 29 November 2016

Somewhere in the South Atlantic 1939, Game 2

The carrier HMS Hermes was built on a cruiser hull, and was therefore somewhat smaller than the later WW2 fleet carriers, but she was purpose built to carry planes (sea-planes initially) and had fore and aft lifts.  She carried a squadron of twelve Swordfish torpedo bombers, and in my second game, with the Kriegsmarine capital ships Blucher and Scheer being shadowed by HMS Cumberland I decided that it is the swordfish that will be next to have a go at the Germans.


Two of the aircraft failed to get onto the tabletop, one being lost in a catapult accident, and another having engine problems and ditching.  That is annoying since I had painted up all twelve.  Come to think of it I painted the carrier as well, and that doesn't get on table. .  That left me with two formations of, five aircraft to take on the Germans, Red Flight and Blue Flight.  They entered the table at mid ceiling, level 3, dropping quickly to level 2 height.   


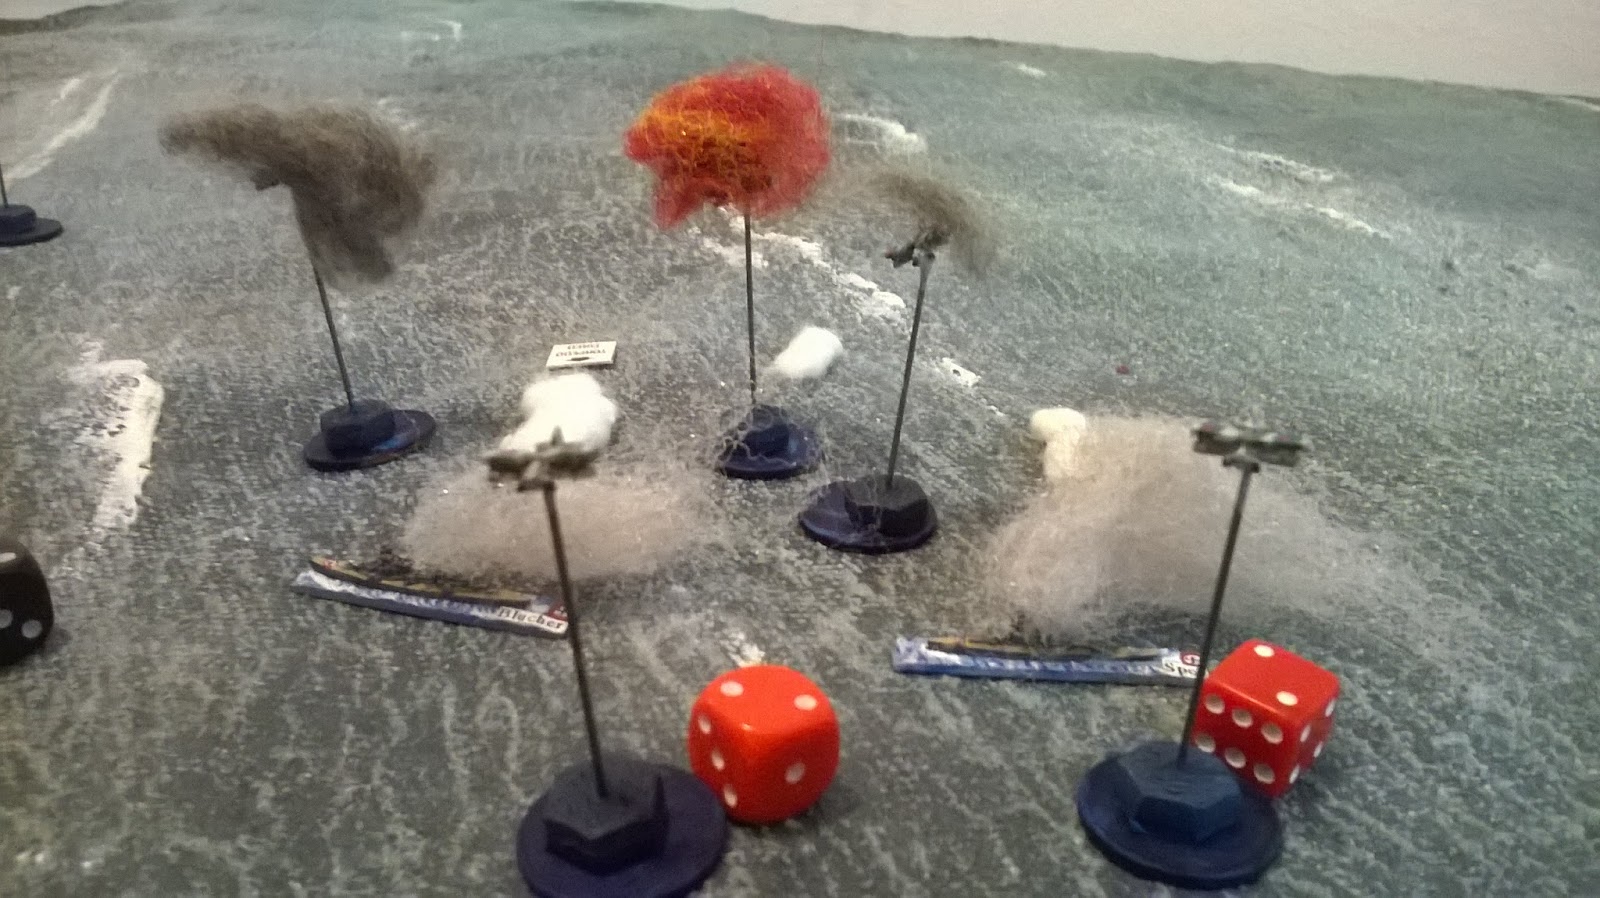
Red flight was first to attack, taking the port side of the German ships.  The Nord-Reich as a Merchant ship was an easy target, but not the priority here.  She turned and moved off to the east.  I divided red flight into two waves.  The first three dived to level 1, 100 feet, and moved in.  The German AA Flak should have dealt with this easily.  

The Swordfish was a notoriously slow aircraft, and almost immediately young Ginger, leading red Flight, found himself exploding at 100 feet, failing to drop his torpedo.  The remaining two in the first wave did manage to drop and began to climb to level two trying to avoid the flak.


Ginger comes to a quick end.
As I turned the Kriegsmarine ships away the second wave dropped from level 1, and also turned away climbing.  Miraculously, apart from the loss of their red headed leader, Red Flight had four of its aircraft regrouping for the return to Hermes.


I turned the Blucher and Scheer sharply to port, as Blue Flight dropped to level 1.  Sly old Squadron leader Quigglesworth, leading Blue Flight in two waves, dropped the first torpedoes cleanly.  Then the havoc started as Bertie's Swordfish lost its engine to flak and dropped into the sea astern of Scheer.  Another of Quiggles flight exploded as it failed to climb away quickly enough, and the Squadron Leader himself had an oil fire in his engine.  That however has never stopped a hero like Quiggles, and he probably made it back to the Hermes with a blazing engine, smoking a woodbine and drinking a horse`s neck of gin!


Quiggles loses half his flight to Flak
I suddenly realised that Quiggles had spread his torpedoes so that one was aimed at Blucher, the rest at Scheer.  Amazingly the Scheer took two torpedoes to the stern, exploded and rolled over.  Blucher took a torpedo midships, essentially undamaged, but critically in game terms, slowed.


Not sure why that lead Destroyer is going the wrong way!
So it seems that the campaign will come down to HMS Renown and her Task Force B.  With Blucher damaged that is probably overkill. (to put it mildly)

Please note that the model of HMS Hermes is in perfect proportion, being the same size as the Cruiser Cornwall in this picture.  My Ark Royal is of a similar length to Renown.  

With the South Atlantic out of the way I will probably turn to the cruise of the Bismarck!


Battle of the River Plate, sort of...

I rediscovered my 1:6000 WW2 Naval collection this morning.  With a huge electrical storm closing in on Cyprus today some gaming seemed the best thing to do with my time  I went for early 
war, and some cruiser actions.  As a wargamer I added in some what if... angles.


The Battle of the River Plate was the first naval battle in the Second World War and the first in South American waters. The German cruiser Admiral Graf Spee was loose in the South Atlantic  and one of the hunting groups of Commonwealth cruisers discovered her off the South American coast.


In my version of history Admiral Scheer (and note that the Brits thought that the Spee was in fact the Scheer) has escaped into the South Atlantic.  The Admiralty has however realised that a second German capital ship, the Blucher, a Deutschland class heavy cruiser, and the Nord-Reich, an auxiliary supply vessel, have made the journey to join her.  


A naval task force has been sent in pursuit of Blucher, hoping to meet with her before the Germans can unite their capital ships.    

In the first game I gave the Commonwealth four cruisers.  HMS Exeter, Ajax and Achilles all fought at the River Plate so were my first choice.  HMS Cumberland was refitting in Port Stanley in the Falklands and so missed the battle, but rejoined the squadron in time to blockade Graf Spee in Montevideo.  For my alternate history Cumberland would be with her sisters, and the first game would have them fighting the Pocket battleship Admiral Scheer.  


The Scheer was sighted at 12000 yards, against the Commonwealth Squadron which was steaming parallel in two divisions, Ajax leading Achilles, and to starboard Exeter leading Cumberland.  The rules would be GQ3, really super detailed, so this one would take a while!


Sheer opened fire as the Royal Navy split forces, their lines diverging.  Ajax came under fire, and immediately took damage as Scheer ranged in.   The other Royal Navy ships began to range in on Scheer, but it was too late for Ajax, as both her front turrets were lost and she was severely damaged.  Making smoke Ajax fell out of line, circling away.  Achillies speed was reduced after a shell exploded among her boilers.  Both light cruisers were out of the fight.


Exeter`s 8 inch guns managed to range in on Scheer, and caused some damage, but the Germans now turned their guns on Exeter and Cumberland.  Trading salvos Exeter was silenced and slowed to a minimum speed.  Her bulkheads gone and clearly sinking by the bow.  Cumberland running past her made smoke to cover herself as Scheer turned away.  

I decided that Scheer had done enough, and turned for the table edge heading for the horizon.   With Cumberland nervously shadowing her the Scheer went in search of Blucher.

The General Quarters 3 rules are really some of the most detailed I`ve ever used.  I quite liked them but it made for a very slow game.   I may have to cut them down to size a little, but overall I`m on to someting with them.  The photos show that this is an empty battlefield.  My 1:6000 ships are lovely models, and they really convey the sense of distance needed for WW2 naval.  


So it`s on to game 2.  The Battle Cruiser HMS Renown, of 15 inch guns, with the Carrier HMS Hermes and her (814) squadron of Swordfish torpedo bombers, have followed Blucher to the South Atlantic.   Next time it`s a bigger game altogether (and may even need two games?)

Saturday, 26 November 2016

Major Mick Dundee at Bardia, 1941 game 1

I`m part way through Robert Avery's Operation Compass scenario/campaign book, using the great "I Ain't Been Shot Mum" rules from Toofatlardies.  The next three games cover the assault on Bardia, a coastal fortress held by the Italians.  In the first game the 6th Australian Division attack a fortified position held by Italian Infantry and Artillery.

The battle is covered in Barrie Pitt's Crucible of War, as well as the Official Australian online history.  Both make great reading.  I made my Big men fictional characters: this was a battle with heroism and tragedy on both sides.  

The paper wargames journal on the table in this photograph is as a result of my returning to bad habits!  I`ve kept one of these on the go for years and I`m meant to be blogging this sort of thing.  Now I`m back in Cyprus I`ll see how I get on, but I used the paper journal to plan these three games.  
   
To create the Italian strongpoint I used light sand coloured felt to represent the trenches.  This is the lighter coloured sand dug out and piled around the trenches.  The anti-tank ditch is a darker brown colour to represent its depth, as are the dugouts.  The main wire at the front of the emplacement was made using strips of cloth from an old ragged tea towel, and the wire perimeter of the outpost itself made from much thinner strips of a stone coloured felt, twisted and looped. 

It works for me! 

Major Mick Dundee of 22 Aus Inf Brigade has only a single platoon of Infantry, plus three Matilda II tanks. The good news is that he has outflanked the fortified position and is attacking the weaker Italian flank.   The tanks went onto the table, being spotted almost immediately.  The following Infantry remained on their blinds a little longer.   

Tenente Alphonso Pachino of the 62nd Italian Infantry division, has two full platoons plus a reserve, as well as MMG and dug in artillery.  His men are in trenches, and he has placed himself, with his reserve, in the rear dugout. Most of his forces were spotted automatically since the tanks were almost on top of his trench line. The tanks were also enfilading the trench line.  After a "Hussar!" of a dice roll the machine guns from the tanks minced the Italian Infantry.  

Major Dundee then lead his own Infantry forward, Australians, elite in close combat.  They day was about to get a lot worse for Tenente Pachino.  With the Italians losing section after section of Infantry to the bayonets of the Aussies the Tenente lead out his reserve in a bid to stem the rout that seemed imminent.  

The Tenente leads out his reserve sections.
I really like the Italian Officer figure in his pith helmet firing his Beretta pistol. This is a Minifigs 12mm figure, but it fits perfectly with my Pendraken 10mm.  Style over substance... that`s my WW2 Italians all over!  
He inspired his gunners to immobilise a Matilda, but its a tank that is quite rightly hard to kill. 
  
Even so the immobilised tank still used its machine guns to spray the reserve as they charged to the rescue. Pretty soon the Aussies came to grips with the Italian reserve, killing two and inflicting four more shock.  The Tenente failed his survival roll and his men promptly ran away.

The fighting around the central Italian gun pits grew nasty as the Aussies closed in, although the Italians managed to kill one man and inflict two shock.  Not really enough since they lost four men and received four shock points too.  

At that point I called it job done.  Mick Dundee had proved that he had a bigger knife than the Italians, although to be fair it was the Matilda Tanks of  7RTR that really won this.  They focused on the Infantry, and especially on killing that Italian MMG, largely ignoring the danger of the Italian artillery.  A risky strategy but it paid off. 

Really nice to get back to IABSM.  I`m looking forward to the next couple of games.  Let's see how Capitane DeNiro does against Mick and his Aussies! 

Friday, 21 October 2016

My 2017 gaming plans

With Christmas music beginning to be heard in the shops, baubles now openly and officially on sale, (no longer an under the counter item) and the first spray of snow being applied to the windows (and it`s mid October for goodness sake!) I thought that I would turn to my planning for next years solo gaming.

With the move to Cyprus last year I didn`t actually plan out my games as I normally would.  The planning for the move, and the dreadful decisions of which wargames collections to keep and which to lose took most of my time.  But this year I am ahead of the game... so to speak.

Actually I have several games in the pipeline, some of which have absorbed a few months of plotting already.  My Bronze Age project will of course be at the forefront, but I want to return to I Ain't Been Shot Mum, and some 10mm WW2 games, as well as develop my Naval gaming with Post Captain. Since this blog is acting as my de-facto wargames journal I thought that I would set out some of my ideas, mainly so that I can refer back to them.


I have been playing through the Toofatlardies brilliant supplement Op Compass, by Robert Avery, for a couple of years now.  Nobody ever accused me of rushing.  I`m not built for it. 

My 10mm 1940s Western Desert setup is pretty well advanced, the British and Italians are complete, and the 1941 Afrika Korps about 10% done.  Next for my Op Compass games are the three interlinked scenarios for the siege of Bardia, a prelude to the fighting for Tobruk, and the first action for the newly arrived Australian Infantry Division.  

Major Mick Dundee will be squaring off against Colonello Alphonse Capone.  I'm planning to get the other members of the Marshal Petain Club to program the forces for me to enable me to fight these three games impartially.  I haven't told them that yet though.


I am carting about a hundred 28mm Sea Peoples figures back to Cyprus with me soon.  The plan is to get these painted and do some skirmish gaming.  I have completed a great little map of Bronze Age Karia, basically Bodrum and Marmaris for the ancient world. 

Three factions compete over this area.  The Karians, allies of the Trojans, as well as fighting for the Hittites against the Egyptians at Kadesh; next the Lukka, allies and enemies of the Trojans and Hittites and like the Karians named among the Sea Peoples in the Egyptian Inscriptions; and lastly the Akwesh identified as Achaeans, holding Rhodes and the Aegean islands.   

This Bronze Age game will allow me to scratch build some Bronze Age ships in 1:600 or thereabouts, and have a few games of
Naumachiae, as well as some skirmish gaming.  A High King such as Priam or Agamemnon is given the title "Anax," so if I end up using Dux Britannium as my rules for some skirmish games I`ll be able to call the games that.  It will however be largely a narrative and character driven game based around raiding and "Sacking cities."  I have some wonderfully camp heroic names worked out.

For my second foray into the Post Captain rules I intend to carry out another Naval Kriegsspiel, this time using the events of Lord Howe's Glorious First of June campaign in the bay of Biscay, concentrating on the scouting frigates and their actions.  It has been meticulously planned and plotted, awaiting only my return to Cyprus to start.  It will need my 1:2400 collection of Napoleonic Naval ships, as well as my 10mm Naval crews, Marines and guns.  Can our Heroes brave the Biscay storms, and maurauding French, and can that elusive Knighthood still be won?  


The last wargame I will mention here is another naval game.  Having used Post Captain last year I am keen to revisit General Quarters III.  One of the collections I kept for my move to Cyprus was a large setup of 1:6000 WW2 Naval.  I plan to start with a simple Hunt the Raider game, a German pocket battleship against a squadron of British cruisers.  I have some great  vintage charts of the Falklands, so with the Germans reinforced for games two and three a repeat of the First World War battles of the Falklands and then Coronel, but using WW2 ships seems like a good idea.  The early war setting and remote geography will limit the role of aircraft.  

These are of course only a few of the games I have in mind, and actually these ones are the most advanced in terms of planning them out.  In terms of painting the Sea Peoples are the main event, but I have several projects just waiting to get onto the painting tray: reinforcements for my Marlburians and Jacobites in 10mm, two 15mm Sci Fi Infantry platoons for the Lardy Q13 rules, a group of 15mm Archeologists and Tomb raiders for some Pulp gaming Chaos in Cairo style games, and of course my 28mm Sharp Practice2 setup(s)  Its going to be a busy year.

Tuesday, 27 September 2016

Kingmaker Cyprus, turn 2

Last time in Kingmaker Cyprus:

Sir Clugney did very little,
Sir Richard got himself killed,
Sir Roland won a battle and had the Bastard crowned King
Sir Gilbert lost a battle, a holy penis and most of his wealth,
Sir Gaston won the above,
Sir Conrad quickly joined the winning side and had his pet Bishop crown the Bastard.


Turn 2

Sir Clugney draws a free move.  He takes his retinue along the coast road to Lemesos.  Clugney is a cunning old devil and his presence here threatens Kolossi Castle and Lemesos, fiefs controlled by Sir Conrad and the House of Richard. (Sir Richard himself was killed in battle last turn and a head of the house will appear next turn)  Clugney does not submit to the new king, since he expects an heir with a better claim to come along.  He ends his move by drawing “il Antonio di Venetzia,” a Holk, or mercenary Great-ship.  He is obviously blocking the port of Lemesos using this great round hulk. Clugney is Admiral of Cyprus, and controls three other ships.  His fleet moves to gather outside the port.
Admiral of Cyprus: Lemesos
Ship  il Bassanio di Genoa (Mercenary) (Galleass)
Ship: Le Roi de Jerusalem of Famagusta (Galleass)
Ship:  La Belle de Kyrenia (Galleass)
Ship: il Antonio di Venetzia, Holk.

The House of Richard are gathered in Pergamos where the new head of the family is being appointed to the Lordship.  The event card dictates that one of the Family departs on Crusade.  Sir William is the only Knight left in the House of Richard, and he duly swears his crusader oath and departs.  Lemesos is being threatened by Clugney but the House of Richard has been weakened and does nothing.  The Crown card drawn is the de Luisignan Prince, the direct heir to the throne.  The House of Richard just placed a target on their backs and the reason for William’s disappearance on Crusade becomes evident.

Sir Roland shocked to hear of a challenge to his newly crowned King of Cyprus draws “Mountain Storms block the passes.  He is in Nicosia with his ally Sir Conrad.  Clugney is threatening his holding at Kolossi castle and his ally in Lemesos.  Worse is the appearance of the Prince and heir in Pergamos.  Braving the Mountain Storms Roland takes his retinue to Pergamos and sets up a siege camp around his old enemies of the House of Richard.  He loses 10AP to the storms.  His crown card draw is a holdings card.  A Byzantine Armourer joins his retinue.

Sir Gilbert is recovering from a humiliating defeat by Sir Gaston.  He has also lost his Holy Relic, the Penis of St Donald.  the sacred Trump due to the odd noises the mumified member makes.  He draws “Skirmish: the Messenger.”  I was at a loss to come up with a game for this until I looked at the crown card draw.  “Prince of Antioch.”  It transpires that Sir Gilbert has been appointed as Prince of Antioch, a pretty much honorific title, since the city of Antioch is currently held by the Turks.  Still Sir Gaston and Sir Gilbert are arch enemies, and Gaston will try to stop any messenger.  Game on...   

The Messenger: Lion Rampant Skirmish Game

Old enemies, Gilbert and Gaston.


 Gilbert is trapped by Gaston's Crossbowmen in a narrow lane.   He loses three knights.
The Crossbowmen are wiped out a bound later as Gilbert's Mounted Sergeants charge them.
Gilbert is caught on the road and killed by Gaston.  The Messenger is captured.  The House of Gilbert is wiped out for two turns.  Gaston wins five victory points.


Wednesday, 21 September 2016

Skirmish on the Cub Run July 18, 1861

Report from the Fredericksburg Monitor July 19 1861.

Blackburn's Ford July 19, 1861.  "The Federal 1st Massachusetts, dressed in Grey uniforms left Centreville at 5am, marching into the woods.  The skirmishers advanced under Lieut.-Col. Wells, and encountered the enemy almost at once as they approached Blackburn Ford.  The Forces of the Confederacy opened a galling fire of musketry or rifles, but without attempting to advance, and seemed only inclined to dispute the passage of the Bull Run, which they evidently supposed the Union Forces intended to make at that point."


Skirmish on the Cub Run July 18, 1861

In the meantime a company had been advanced to take and hold the passage over the Cub Run, to defend the left flank of General Tyler`s advance.  These were of the 11th Massachusetts, under Captain Floyd “Parson” Farthingdale.   The company calling themselves the “Parsons’s Flock” advanced over open ground to the ford. 

Lieutenant Winfield Armstrong Fluster was sent forward into the woods across the Cub Run leading the “Parson’s” skirmishers. 

Lieut Fluster discovered the enemy, as he supposed ; but having seen the grey of the 1st Massachusetts Regiment, and being a ditherer and a stutterer,  fearing to give the order to fire, lest he might shoot some of our own men, he ran forward, exclaiming, "Wwwho are yyyyou ? "

The Texican Sergeant, Jubal Krebbs a notoriously rough man called back almost the same question,  "So who the f*ck are you? "

When Lieut. Fluster  incautiously and with some pride responded, "We are Massachusetts men."  A great volley of musketry was immediately loosed by the Texans causing him to fall to the ground.  Here however the Gallant Lieutenant drew a formidable hand gun from his oversized holster, and loosed a shot in return, the recoil of which once again knocked him to his posterior.


Fluster’s men began to withdraw, firing as they did so, awaiting the rest of the Company’s arrival in support.

Hearing the shooting that had now commenced between Fluster’s Skirmishers and the Texicans the Parson ordered his men over the Cub Run along the road for the Island Ford over the Bull Run.  The terrain was difficult but he deployed into a loose Company line and made his way forward. 


A map of the action.

The 11th Massachusetts cross the Cub Run but are blocked by a ravine.  The Texas company of Cocke's Brigade use the ravine as cover and can volley three units to the single unit that the Union try to push forward.

After the Union company had gone some distance along the Island Ford Road they came across a gully, or dry ravine, which extended downwards in the direction of Bull Run.  Across the Gulley and using the terrain to advantage were the 2nd Texas under Major Quincy Ewing Whitemoore. The Texas men were ordered to level their pieces and to take aim.


The Parson`s flock found themselves exposed to a murderous fire from the ravine.  Each man covered himself as well as possible, and sought for an opportunity to return the fire.  But at first the enemy were completely invisible.  They poured in volley after volley, managing to remain concealed themselves.


At this juncture the Parson shouted “Testify to the Lord Brothers,” and charged forward firing his .44 Navy Colt upon the several places where the Confederates lay concealed. This caused a severe fire to be concentrated upon the Parson.  

Sergeant Major McSinister was shot in the groin and carried from the field.  He did not live to see the other side of the Run.  The Parson himself was shot in the Bible, and he lost heart, leading his men in a rout back across the Cub Run, to the jeers of the Texas men.

Young Fluster was forced to cover the retreat with the remains of his skirmishers.  The exact circumstances are unknown, but it seems from eye witness accounts that Fluster led a gallant action, until he fired his over sized pistol at a Confederate Officer.  

Fluster was knocked to the ground amid clouds of powder smoke, and his men fled.  The Lieutenant, his face sooty, made his way back, having sustained a wound to his head that made him appear cross-eyed for the rest of his days.  Of course the way things are going the rest of his days may not take long!

Notes

The Battle of Blackburn's Ford took place on July 18, 1861 It was a precursor to 1st Bull Run, and occurred only as a result of a Union General exceeding his orders.  The Lieutenant declaring "We are Massachusetts Men," and the volley's from cover that decimated the Union, were taken from that fight, although it occurred at the next ford to the East, and not over the Cub Run.

My Officer casualties were extreme in this game, for the Union at least. Three Officers fell, with my later rolls determining that one was injured permanently and one merely stunned.  Losses among the troops was also disproportionate.  The Confederates lost only one man, to the Federals ten.   

The Parson must now rally his men, and prepare for 1st Bull Run two days after this battle, on 21st July.  
I may wait until I`ve painted more Confederates before attempting it!

Monday, 12 September 2016

The 11th Massachusetts Regiment mustered for action

I`m back in Cyprus and the first game I have planned is an American Civil War encounter game.  The forces of the Union are just about ready and I spent a nice sunny afternoon on the terrace sorting out their basing. 

Using an additional 16 Em4 Miniatures 28mm plastics brings my Regiment/Company up to 48 line, as six groups of 8, and a group of 6 Perry miniatures metal skirmishers.  The command figures at the front of the regiment are Captain Status III Floyd "Parson" Farthingdale, Lt. Status I Winfield Armstrong Fluster, and Sergeant Major Status II “Grievous” McSinister.  


One of my favourite moments from the Movie "Glory," is when our brave young Colonel points to the standard bearer and asks in a slightly high pitch voice "if this man falls who will pick up the flag?"  I have no problem with the Colonel.  He went on to die gloriously... and later in his career killed Godzilla during one of the big lizard's more destructive rampages.  I do have a problem with the fact that only one brave/idiotic soul in the regiment (also a Massachusetts force) volunteers.  Its a dreadful job it seems, almost guaranteed to get you killed in that movie, but it just seems too scripted and contrived in a movie that is otherwise one of my favourites.  


My second Standard bearer is shown above, and he is carrying a white flag.  This is of course because its a cast on flag and I am having serious qualms about painting it.  More caustic members of the Petains may see it as a sign that the Parson is ready to surrender at a moments notice... time will tell. The picture also shows my "spare" Officers.  I made a decision for this campaign that I will maintain a roll of the honoured dead, and when one of my command group gets killed I will replace him with a newly appointed Officer.  


I`m interested to see if I can get through the war with the minimum of casualties. 
I also have to confess that the Confederates are only about half painted, so I`m planning to use a lot of grey undercoated figures.

In the meantime a line of 6 groups looks impressive!
The 11th Massachusetts.  58 figures.